

Tuesday, 8 December 2009
Make & Take Friday 4th December
I had some new stamps in from Hobby Art so decided to use them this week. The trees were stamped first then a mask placed on each one so that I could run the brayer over for the sky, with another mask for the moon.

Make & Take Friday 27th November
This week everyone could chose what they wanted to do using this technique.
So here are my 2 samples.
Using a waterproof mat and Adirondack or Distress inks, rub 3 colours on the mat and then add a small spray of water then drag a piece of hite card through the inks, you will end up with a coloured piece of card, dry, then stamp using bleach as your ink, this will bleach out some of the colour on the card. Now stamp again slightly out of line with the bleach image using a co-ordinating ink. Then just build up your card.


Make & Take Friday 20th November
Just quite a simple card for this week. The small trees are stamped on the inside of the card and the front is cut an inch smaller so that you can see them.

Friday, 27 November 2009
Make & Take Friday 13th November
This reindeer is from a set of stamps by Woodware, I hahave used them quite a lot and have 1 workshop that is just using this set. He is coloured using a Pearl-Pallette which I think are great for colouring.


Make & Take Friday 6th November
If you pull the tag the picture pops up, in this picture I havn't finished colouring the mouse and the cat. I shall upload the instructions for this and other cards on to the main web site at --
www.sdcardcrafts.com
at a later date.

www.sdcardcrafts.com
at a later date.

Saturday, 31 October 2009
Make & Take Friday 30th October
Quite a simple card this week but we did make the flower which is just a concertina strip joined in circle and laid flat. The background is patterned paper that has been stamped with Versamark and Cosmic Shimmer brushed over for an extra bit of shine, you can just about see the swirls.


Sunday, 25 October 2009
Make & Take Friday 23rd Oct
The dragonfly on the bull rush has been stamped using Stazon then coloured using chalks.


Make & Take Friday 16th Oct
A Here I have stamped on to vellum using Brilliance ink pads, white branches and then the fern stamped with a 3 colour Brilliance ink pad.The vellum is then attached using brads.


Make & Take Friday 9th Oct
2 different views of this 3D acetate fish card, using acetate over a zig zag card.


Saturday, 10 October 2009
Club night 24th September
Tonight we had a play with metal sheets, stamped them and dry embossed from the back to push the flowers out.


Club night 9th September
Tonight we made cards using serviettes, just using the top layer of the serviette and stick it on to white card, I use Tombow glue or you could use Mod Podge. Then just cut out and layer on to your card.


Make & Take Friday 2nd October
Just a simple card this week, Penny Black stamp just stamped and embossed with clear powder then coloured in.


Make & Take Friday 25th September
The baubles are solid stamps so I inked them up with Encore Teal ink and then took a clean and dry snowflake stamp and stamped on top of the teal inked bauble which takes off the ink, then I stamped on to white card and embossed with clear powder.


Make & Take Friday 11th September
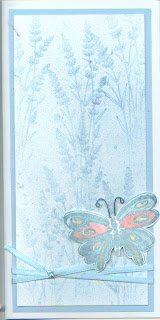
The background has been made by spraying the card with Glacier Glimmer Mist. Once dry it has been stamped using Versamark then Cosmic shimmer mica powder brushed over so that it sticks to the Versamark, the butterflies were then stamped in Black Versafine and clear embossing powder, then coloured using the Cosmic Shimmer again mixed to a paste so you can paint with it.
I made several different versions of this card as I really like it.

I made several different versions of this card as I really like it.

Sunday, 13 September 2009
Club night 27th August
Tonight I gave everyone the same bag of card, mixed paper, and ribbons, brads and buttons. These are the finished cards.


Carole

Barbara

Sue

Julie

Charlotte

Carole

Barbara

Make & Take Friday 4th September
Today I thought I would bring the chalks back into use.
I have punched a large scalloped circle on a piece of scrap paper to use the punched hole as a template. Place template over a piece of white card and secure in place so it doesn't move, stamp the flowers and words using Versamark into the circle. Now use one colour of chalk and a cotton wool ball and pull in colour fro the edge , the colour will pick up more on the stamped area.
Trim the image and layer on to lilac then mauve card, the main card has been folded in half and then the front folded back, 4 pieces of card attached to each side then the image has been layered on top in the centre.

Make & Take Friday 28th August
A lovely clean looking card, swirls have been stamped across top and left side of a white piece of card, this has been layered on to mauve card then on to the card base. The flower stamps by Fancy Pants have been stamped and cut out, coloured and layered and placed in the top left corner. Add glitter and gems.


Tuesday, 1 September 2009


Using a Brayer workshop
These cards have been made using a Brayer. I showed everyone different ways of using your Brayer, then we made these cards using some of the sample pieces.


Butterflies and Mica powder workshop
These are the cards from the "Butterflies and Mica powder" workshop
This first one was made by one of our regulars -Ruth, thanks Ruth.


This first one was made by one of our regulars -Ruth, thanks Ruth.


Make & Take Friday 21st August
This is called a wiper card because the flap pops up like a windscreen wiper when you pull the 2 ends of the card.


Make & Take Friday 14th August
On a piece of ivory card I have sponged the clouds using a cloud template, at the bottom I used a piece of ripped paper to make the hills by pulling the ink off the edge with a sponge in 3 shades of green. I then stamped the poppies in different colours. The red card has been stamped with Versamark.


Make & Take Friday 7th August
I have sponged atround the edges of a piece of white card and stamped the corners with a swirl stamp, placed 2 pieces of ribbon above and bolow, stamped a greeting and small flowers. I stamped a bird and cut it out and placed it in the middle.


Make & Take Friday 31st July
This card has a flap that pulls out from a slit in the front of the card so that long picture then joins up.


Make & Take Friday 24th July
Here I have used a sheet of double sided sticky tape and stuck it on a piece of white card then peeled off the front and stuck a rectangular layered image then around it I stuck on pieces of patterned and plain paperleaving gaps. Once it was filled i then filled the gaps with glitter.


Make & Take Friday 17th July
The background on this card has been made using Dylon cold water dye, a piece of white card has been sprayed with water then i have tapped the powdered dye on to the wet card and it runs into the wet card. I have used 2 different colours on here -purple and green, as you can see the dyes are made up of different colours.


Subscribe to:
Posts (Atom)